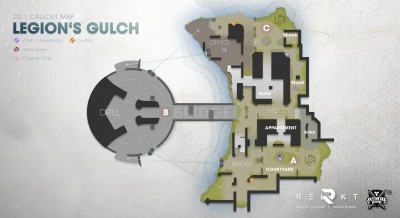
Legion's Gulch
| |
This page describes content which is not available in the game. |
|---|---|
| "Legion's Gulch" was moved into the Destiny Content Vault in |
| Legion's Gulch | |
|---|---|
| Information | |
| Zone | European Dead Zone, Earth |
| Playlists | Quickplay |
| Expansion | |
| Exclusivity | No |
Legion's Gulch is a PvP Map.
Overview
Legion's Gulch is set in the EDZ zone on the planet Earth. It was launched with the base Destiny 2 game as one of the initially-available Crucible maps.
Match Types:
Crucial Locations
Courtyard
Courtyard contains one of the team spawn points. It is a large outdoor area on one side of the map, with multiple entry points. Despite featuring plenty of cover, the size of the area makes it suitable for snipers that are looking to catch other Guardians off-guard.
During games of Clash and Supremacy, Courtyard holds one of the three Power Ammo spawn points. During Control matches, the area holds just a single Power Ammo spawn point, but it also features Capture Point A.
Bricks
Bricks is a tiny area that connects Courtyard and Middle. It features three separate paths. It is best used as a rotation and flanking route. Guardians that are quick on their feet could use the area to disengage from a firefight and shake off any pursuers.
Apartment
Apartment is a ruined building that serves as the central path between Courtyard and Middle. During heated firefights, it can easily turn into a chokepoint, due to its narrow passage.
Alley
Alley is a small area that connects Courtyard and Middle. It provides relatively good cover and it is mostly used as a flanking route and by sniping Guardians that monitor either Courtyard or Middle (or both).
Middle
Middle runs across nearly the entire map. It comes with a lot of cover opportunities and several access points. This creates several different flanking routes, as well as a good sniping angle in the area.
Bridge
Bridge is an area that connects Middle to Drill. As its name suggests, it is a narrow bridge with a couple of cover options. Guardians should be mindful that there is very little room for escape in this area, so staying there for too long could prove to be deadly.
During Clash and Supremacy matches, Bridge holds one of the Power Ammo spawn points.
Drill
Drill is one of the most likely places on the map for a heated firefight to break out. It features three access points - two from launchers to and from the crumbling ruins and one from the Bridge zone.
However, it is also a good place to take a breather and recover some health. The area features plenty of cover options and the launchers make for easy escape routes when players get attacked.
During games of Control, Drill holds one of the Capture Points.
Office
Office consists of a large exterior area, as well as the largest structure on the map that players can enter. It is also a high-traffic zone, so firefights are not unlikely. Thankfully, there is plenty of cover to utilize here. The zone also holds one of the launchers to and from Drill.
During games of Control, Office holds one of the Power Ammo spawn points.
Hotel
Hotel is a high-traffic area, but it can also serve as a good zone to recover between firefights.
It comes with three access points and a central pillar that can serve as cover. This makes it great for shaking off pursuers or setting up ambushes on unwise Guardians.
Street
Street is a narrow area that connects Cliff and Shack to Middle. It is close to the edge of the map, which makes it a good flanking route. It also comes with plenty of cover, which can be utilized by snipers.
During games of Clash and Supremacy, it also holds a Power Ammo spawn point.
Shack
Shack is a small structure with two access points. It is best utilized as a location to catch a breather or an area to set up some good sniper shots towards Street or Cliff.
Cliff
Cliff is an open area with very little cover. It holds one the team spawn points. During games of Control, a Capture Point is also found here.
Strategy
Points to Capture in Control
A & C - I'm still not 100% on what is best for this map. I tend to aim for A and C control as I personally don't like flying across the teleporters when you don't know what's waiting for you on the other side, and going across B bridge just seems like it's always a terrible idea. You will find yourself almost immediately jumping from one point to another for most of the game this way, but you can fairly easily catch your opponents off guard if you run around as a big group. Especially if you have 'nades for the points.
Callout Map
