Endless Vale
| Endless Vale | |
|---|---|

| |
| Information | |
| Zone | Arcadian Valley, Nessus |
| Playlists | Quickplay, Competitive |
| Expansion | |
| Exclusivity | No |
Endless Vale is a PvP Map.
Overview
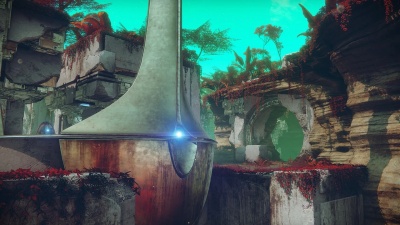
Endless Vale is set in the Arcadian Valley zone on the planet Nessus. It was launched with the base Destiny 2 game as one of the initially-available Crucible maps.
Match Types:
Crucial Locations
Blocks
Blocks is an area that typically serves as a team spawn point. During Clash and Supremacy matches, it contains a Power Ammo spawn point. During Control games, it holds a Capture Point.
Portal
Portal is an area that is best employed to either take cover from enemy fire or as a flanking route. It offers a good firing angle towards Shrine, but splash damage could prove to be a problem here.
During Control games, Power Ammo spawns here.
Shrine
Shrine is the area that sees the most Guardian traffic during any game, as well as the most intense battles. It features a large raised altar in its center, which offers some good lines of fire towards adjacent areas, but it also leaves players on it vulnerable due to lack of cover options.
During Clash and Supremacy games, the area holds a Power Ammo spawn point. During Control, a Capture Point can be found here.
Mid
Mid is the main intersection of the map. It comes with access points from all four general directions that connect to all major zones. It features plenty of cover, so it can be used to shake off aggressive pursuers and players don't have to worry about snipers too much.
Drain
Drain is a simple drop from Mid to Temple. Its only purpose is to add an elevation change. That can be used to break line of sight with a pursuer or set up an ambush. However, when players descend or ascend through Drain, they will have no visibility towards whatever is ahead of them, so caution is advised.
Temple
Temple is an area on the edge of the map. Despite being an interior zone, it has a pretty high ceiling that allows for some vertical movement. Additionally, it comes with several access points that can offer goud flanking or escape routes. It also features plenty of cover, as well as some good firing angles towards Blocks and Gulch.
Gulch
Gulch is a zone that is nearly identical to Blocks when it comes to layout. It also serves as a team spawn area.
During Clash and Supremacy games, Gulch holds one of the Power Ammo spawn points, while during Control, Capture Point C can be found here.
Bend
Bend is a small curved corridor on the edge of the map. It is best used to break line of sight with pursuers or set up an ambush. During Control games, Bend holds a Power Ammo spawn point.
Points to Capture in Control
B & A or C - Actually one of the more balanced maps. I personally like trying to hold C and B, but A and B can honestly work just as well for this map.
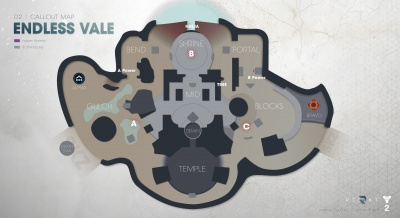
Callout Map

Characteristics
Basically diamond shaped. The 3 defining lanes go between the initial spawns, and there are 3 intersecting lanes (referred to as Across Lanes). Think of it as a mix of Asylum and Pantheon, with the Control Point location and verticality of Asylum (high B point, lane that runs from B straight down to a low area), and the extra middle across lanes of Pantheon.
Battle Types
From the gameplay we've seen, and basic study of the map, it appears that most of the mid and shorter long range engagements will be taking place on the outside lane leading from each spawn to B point. There are a couple pieces of cover between the Portal and Bend and B, but they are small and spread apart, so longer range weapons like pulses and scouts will have the advantage here. Skilled players with shorter range weapons will be able to cross the distance between cover points, but they'll need to be smart about how they do it if they don't want to be picked off. Both initial spawns favor shorter mid-range weapons like pulse rifles, but they offer plenty of cover than AR and HC users can take advantage of to either escape or close the gaps. In Mid, short range weapons are decidedly the best best, but there are lots of egress points that players can use to disengage, should the need arise. Lower Temple favors close and short-mid range, but there is almost no cover in the center of the pit, so be careful going down there.
Engagement Flow
Again based on the gamplay we've seen, engagements tend to be focused on and around B, looking outwards into Mid, Bend, and Portal. Good teams will be able to prevent players from from crossing through Mid and Temple, thus holding one side and B, and forcing the opposition to push outwards from an initial through predictable lanes. If a team cannot hold the Mid lanes, then players will be able to collapse on B from there, or flip the spawns and flank. Temple is far away from the action, and thus will probably only see heavy traffic when a player is taking a long flanking route, or players are fighting over the power ammo which spawns there. Mid will likely see the majority of pushes going through it, as it's easier to close the distance with the amount of cover provided. Distracting players on B with Mid pushes provides an excellent opportunity for longer ranged attacks from either Bend or Portal. Although unlikely, I foresee some teams attempting to hold A and C, but that is a much longer line to defend, and the risk of being collapsed upon or leaving individuals isolated is quite high.
Important Information
- Symmetry - Although each spawn has unique geometry, the map is basically symmetrical, and the control points don't seem to favor defenders on either side.
- Areas/Focal Points - The areas are listed on the call out map, but notable things to recognize are the giant trees, which mean you're in Gulch, the diamond shaped piece of cover which is in Mid and near Drain, and the high spire which is on B (aka Shrine). Temple is also easily recognizable as the lowest lying point on the map, and Blocks is the spawn point without giant trees. Elbow has a more defined bend than Portal does, which has an open entrance.
- Entrances - Mid has 4 main entrances, which makes it very hard to defend if there is no one on B or in Temple. Likewise, both B and Temple have 3 entrances, and their defense is also made easier by having a teammate in Mid. Each spawn has 3 ways to get out, but thanks to the amount of cover provided there are multiple routes within each path.
- Choke Points - If you control B point and Mid, then Portal and Bend become the main choke points, depending on which side the enemy spawns. Spawn entrances to Mid will be a secondary choke points, and A or C entrance to Temple will be the third. Preventing them from pushing through any of those points will keep them trapped on one side or the other.
- Pick Ups - The only pick ups on this map are the 3 Power Ammo boxes, located in Temple, Bend, and Portal.
- Cover - High lane to B has limited cover, basically two small boxes on each side. Initial spawns have lots of cover, and Mid is basically walled in with low central cover. Temple has no cover in the center, but columns on each side.
- Verticality - Most of the map plays at the same level, with B slightly elevated, and Temple depressed. B allows the ability to shoot down on attacking players, while Temple will force you to shoot up and out. Be careful of trying to push out from Temple, as the stairs out make you predictable.