The Dead Cliffs
| The Dead Cliffs | |
|---|---|

| |
| Information | |
| Zone | European Dead Zone, Earth |
| Playlists | Quickplay, Competitive |
| Expansion | |
| Exclusivity | No |
The Dead Cliffs is a PvP Map.
Overview
The Dead Cliffs is set in the EDZ zone on the planet Earth. It was launched with the base Destiny 2 game as one of the initially-available Crucible maps.
Match Types:
Crucial Locations
Lockers
Lockers is an interior area with very little cover. This makes it suitable for aggressive strikes on opponents. It also offers good lines of sight towards Trucks and Depot, which makes it very good for long-range engagement towards these areas. It can also be used as a flanking route between the two zones.
Lockers holds one of the team spawn points.
Trucks
Trucks is a large open area, with one central bit of cover. It is mostly used as a junction between Lockers, Depot, and Ivy. However, during Control games, it will also hold a Power Ammo spawn point.
Depot
Depot is an interior area with raised roof and multiple floor levels. It comes with a total of four entry points, which makes it quite difficult to hold. However, during Control games, it holds one of the capture points and during Clash matches, Power Ammo can be found here.
Catwalk
Catwalk is an area on the edge of the map that is a popular movement lane. Players should be mindful of the low railing here. Accidentally jumping over them will result in an immediate death. However, the sharp corners and the varied terrain make it suitable location to shake off a pursuer or break line of sight and draw them in for a close-quarter battle.
During Control matches, Catwalk is the location of one of the Power Ammo spawn points.
Ivy
Ivy is the central junction of the whole map, which makes it an area of heavy traffic. Other than that, Ivy is also important because the tie-breaking capture point in Survival matches will spawn here.
Rubble
Rubble is a relatively open area that will hold the only Power Ammo spawn point during Survival matches. This makes it a popular target zone for snipers. Any player caught off-guard by a skilled sniper here has very slim chance of making it out in one piece.
Garage
Garage is a small interior zone and the only way in and out of Back. During Clash matches, this area holds one of the Power Ammo spawn points and during Control - Capture Point B. Clearing Back and securing Garage will give players an easily defendable capture point.
Back
Back is an enclosed area, only accessible via Garage. Since it is essentially a dead end, it is best used as a place to fall back to during firefights in Garage. It can also be used to set up an ambush on a pursuer.
Pipes
Pipes is a small exterior area halfway through a major sniping lane on the map. This makes the central piece of cover extremely useful. Players should mind their step here, as going over the low railings results in instant death.
Hall
Hall is a small interior area with a low ceiling. It serves as a junction between Catwalk, Mill, and Pipes. Players should do their best not to be caught here, as splash damage and crossfire can prove troublesome to deal with. The narrow space and low ceiling limit movement options significantly.
Console
Console is a tiny interior area inside Mill that offers great firing angles towards the main area below it. However, it is also easy to flank someone in Console, so Guardians should make sure not to stay there for too long.
Mill
Mill is the largest area on the map, covering an entire edge of it. It consists of both interior and exterior areas. When moving around Mill, players should watch their step or risk taking a lethal fall off the edge of the map.
During Control matches, the zone holds one of the capture points. During games of Clash, it holds a Power Ammo spawn point.
Points to Capture in Control
B & C - This map is HORRIFICALLY unbalanced. You want C and B, don't even think about touching A. The spawn trap on A side is atrocious and is enough to make babies cry, just ignore A flag. If you start the game in A side it's normally easier to push C first. This can force your opponents to spawn A which will help you capture B. After that just pin your opponents into A as best as you can and you should be good to go.
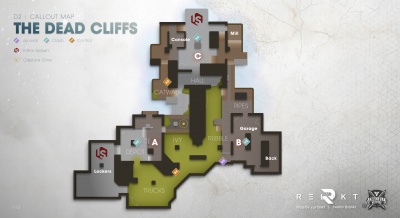
Callout Map
