Altar of Flame
| Altar of Flame | |
|---|---|

| |
| Information | |
| Zone | Caloris Basin, Mercury |
| Playlists | Quickplay, Competitive |
| Expansion | |
| Exclusivity | No |
Altar of Flame is a PvP Map.
Overview
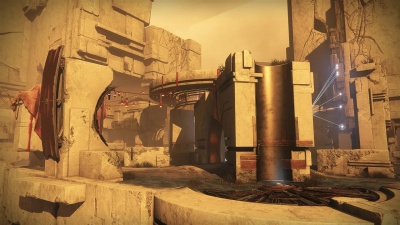
Altar of Flame is set in the Caloris Basin zone on the planet Mercury. It was launched with the base Destiny 2 game as one of the initially-available Crucible maps.
Match Types:
Crucial Locations
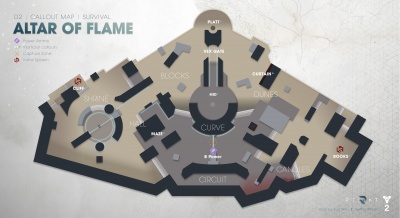
Dunes
Dunes is a high-traffic area on one of the map's sides. Despite technically being an open area, it features plenty of cover for players to utilize in a firefight.
Here, players will also find the only interior area on the entire map. It is a spawn point for one of the teams and can be found on the end of Dunes that is the furthest from the map center. That location is unofficially called Books.
During games of Control, Dunes is one of the two zones where Power Ammo will spawn.
Candles
Candles is a small area near the edge of the map. It is a popular flanking route, due to its four access points that can lead a player to Dunes, Circuit, or Curve.
During games of Control, one of the capture points will be located in this zone. Due to its relatively small sizes, holding Candles can sometimes prove difficult, but a few well-placed obstacles can shut down some shooting angles for attackers, making the task much easier.
Circuit
Circuit is a narrow corridor with three entry points. It is best utilized as a rotation and flanking route.
During games of Clash, there will be a Power Ammo spawn point in this area.
Curve
Curve is an area that divides the center of the map. It is relatively large and open, so lingering there for too long could prove to be deadly. However, some cover opportunities are present, in case a firefight breaks out in this zone.
During Survival matches, Curve is the only zone where Power Ammo can be found.
Gate
The Gate area is considered to be the actual center of Altar of Flame. It consists of a large central altar on one side, a Vex gate on the other, and a narrow lane connecting the two.
Try not to get caught off guard in the Gate area. It provides a good opportunity to ambush an unaware opponent, but if you are caught there, you will have little cover to rely on.
During Control matches, Gate will hold a capture point. During Survival, it is where the tie-breaking capture point will spawn.
Disc/Platt
The Disk area, also called Platt is a tiny zone just behind the Vex Gate. It is best utilized as a flanking route when rotating between Blocks and Dunes.
During Clash matches, Disc will hold a Power Ammo spawn point.
Blocks
Blocks is a large, relatively-open area just off the center of the map. While it is the fastest route from the Cliff spawn point to Gate, players traversing it should be mindful of enemy snipers. The zone doesn't offer that much cover and there are several dimly-lit vantage points that overlook it. A careless Guardian could easily be shot down without even seeing the enemy.
During games of Control, there will be a Power Ammo spawn point in this area.
Hall
Hall is a small area, connecting Shrine, Blocks, and Curves. It is a popular flanking route, as well as an excellent sniping position. It offers some great shooting angles towards Blocks and four access points that can prove beneficial during a retreat.
Shrine
Shrine is a large, relatively-open area on one side of the map. It holds a team spawn point, which means that one team often has a tight grip on this area.
During games of Clash, Shrine holds one of the three Power Ammo points. In Control games, it is where one of the capture points is located. This makes Shrine a key area in just about any match.
The zone offers several good vantage points for snipers, as well as plenty of cover and dim lighting. This makes it a great area to shake off pursuers and set up ambushes.
Strategy
Points to Capture in Control
B & C - Getting B should be priority here. It normally is the centre of grenade spam first thing, hold your grenades back just a little bit so you have some to both defend and destroy the team if they do decide to jump on the flag. Other than this C is easier to hold than A in my opinion, so C and B is the way to go.
Callout Map
